

A Complete Guide to Camouflage Tattooing for Scars
What Is Camouflage Tattooing for Scars and Is It for You?
Scars often tell a story, but not every story is one we want to see in the mirror every day. If you live with a scar from surgery, an old injury, or even stretch marks, you've probably wished for a way to make it fade into the background. That's exactly where camouflage tattooing comes in—it’s a highly specialised technique that works like a permanent, perfectly colour-matched concealer.
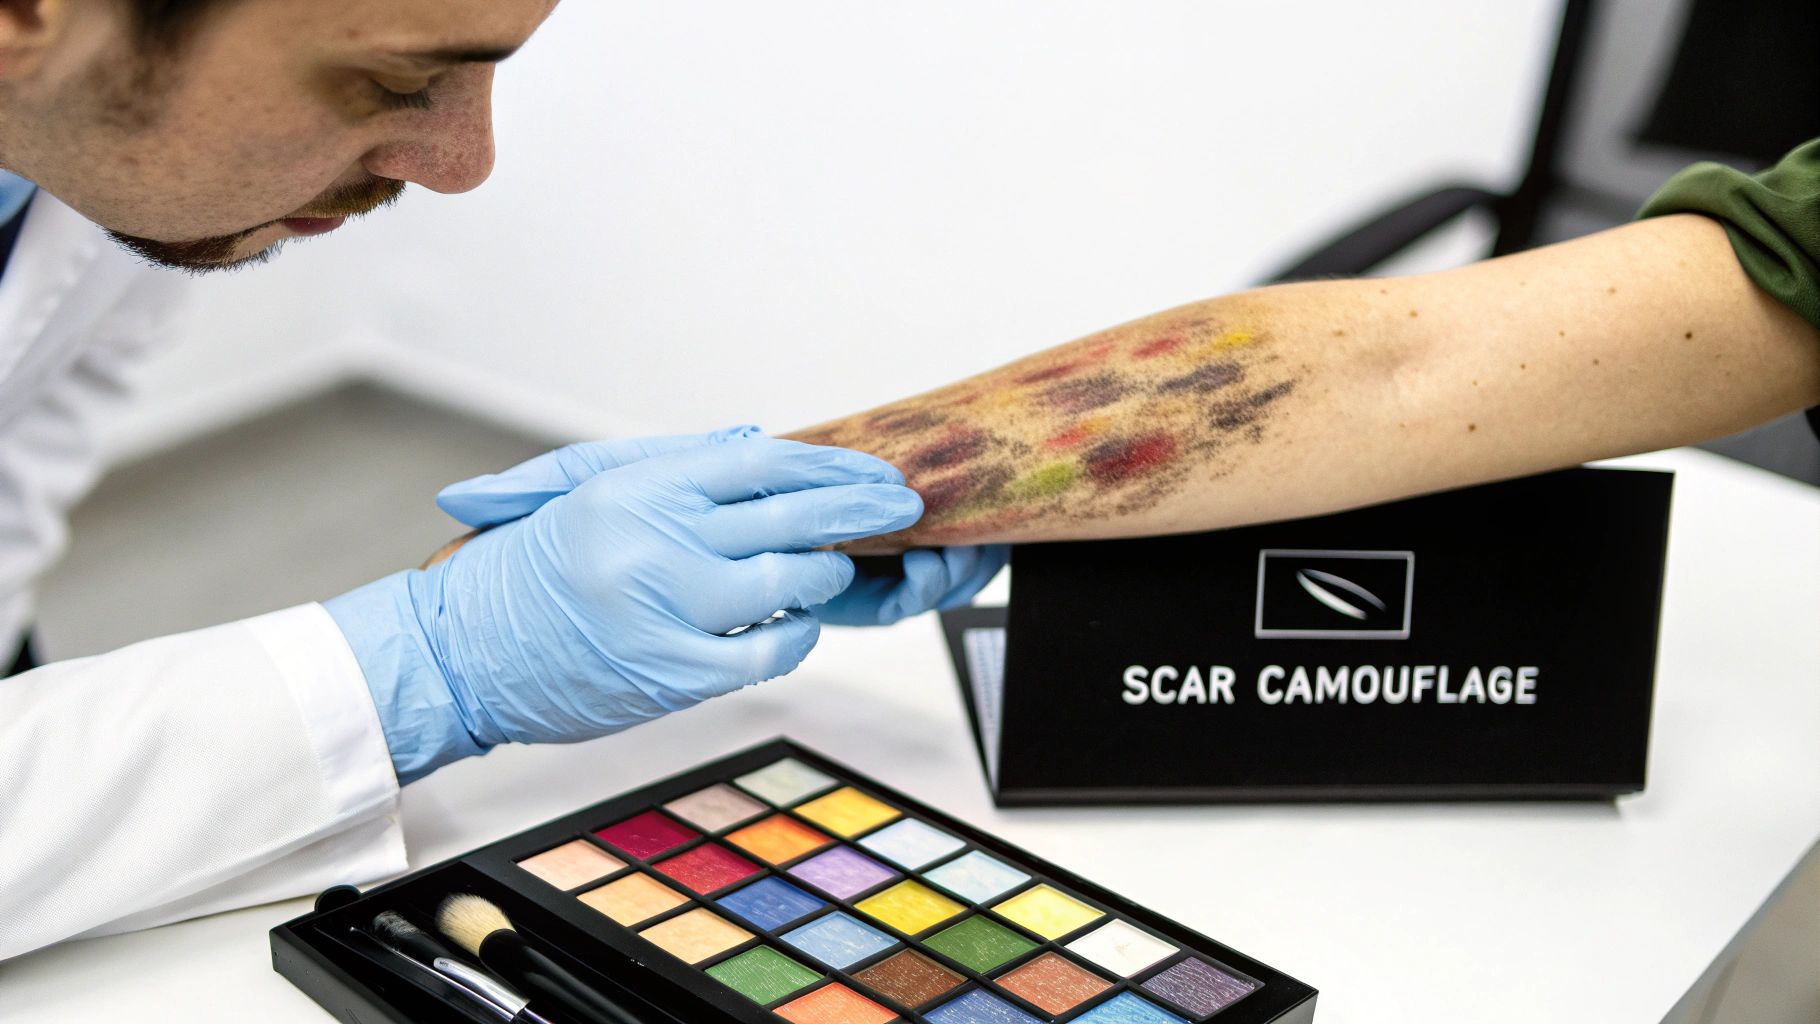
Think of a skilled artist restoring a priceless painting. A paramedical tattooist brings that same meticulous attention to detail to your skin. By carefully depositing custom-blended, skin-toned pigments into the scar tissue, the goal is to soften the scar's appearance, helping it blend almost seamlessly with your natural skin colour.
It’s no surprise this technique has gained so much traction. Driven by the body positivity movement and huge leaps in pigment technology, more and more Australians are looking for lasting solutions. In Sydney alone, some clinics have seen a 150% jump in enquiries, with over 70% of these related to post-surgical scars from C-sections and mastectomies. It’s a powerful option for people wanting to regain confidence.
Who Is an Ideal Candidate?
While it sounds incredible, camouflage tattooing for scars isn't suitable for everyone. The success of the treatment really hinges on the specific characteristics of the scar tissue.
To help you understand if this might be right for you, here’s a quick guide.
Quick Guide to Scar Camouflage Suitability
| Factor | Ideal Candidate | May Not Be Suitable |
|---|---|---|
| Scar Age | At least 12-18 months old, fully healed and settled. | A newer scar that is still pink, red, or actively changing. |
| Scar Colour | Lighter than the surrounding skin (hypopigmented). | Darker than the surrounding skin (hyperpigmented). |
| Scar Texture | Flat and relatively smooth to the touch. | Raised, bumpy (hypertrophic), or keloid scars. |
| Skin Tone | Stable skin tone that doesn't tan easily or dramatically. | Skin that tans significantly, as the tattooed area won't change colour. |
In short, the best candidates have mature, pale, and flat scars. Because we are adding colour, the technique works beautifully on scars that have lost their natural pigment. The same core principles are even used in other cosmetic fields, like scalp micropigmentation. If you're curious, our guide on concealing scars with scalp tattoos offers a different perspective on this.
Types of Scars Commonly Treated
This procedure is incredibly versatile and can make a real difference for a wide range of cosmetic concerns. The aim is always the same: to restore a more uniform look to the skin, helping you feel more comfortable.
The most rewarding part of this work is seeing a client look in the mirror and focus on themselves, not their scar. It's about restoring confidence by minimising a constant visual reminder of past trauma or surgery.
Some of the most common applications include:
- Surgical Scars: Marks left from procedures like tummy tucks, breast augmentations, lifts, or C-sections.
- Injury Scars: Scars from accidents or cuts that have healed and left a pale, white-ish mark.
- Stretch Marks (Striae): Effective once they have faded over time to a silvery-white colour.
- Self-Harm Scars: A powerful option for individuals who are ready to move forward and conceal reminders of a difficult past.
Of course, the only way to know for sure if this is the right path for you is to have a professional consultation. An expert can properly assess your scar and have an honest conversation about the kind of results you can realistically expect.
The Art and Science of Matching Your Skin Tone
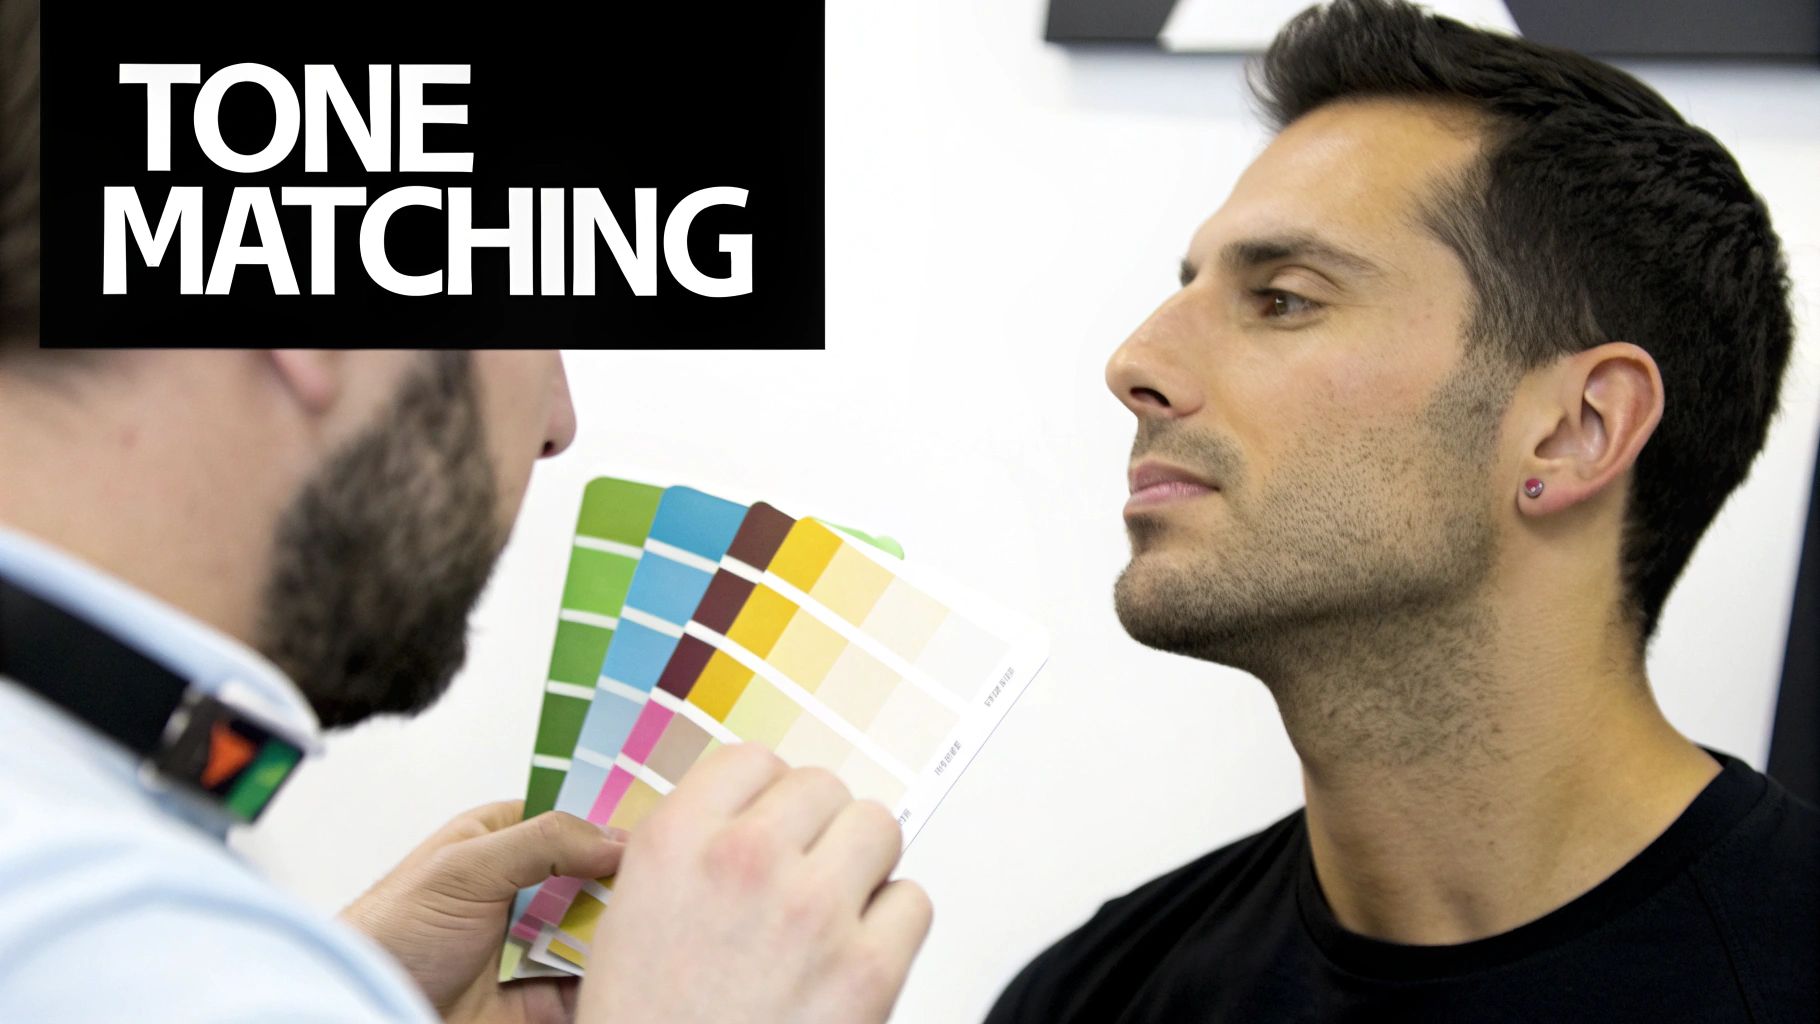
Getting a natural result with camouflage tattooing for scars isn’t as simple as picking a pigment that looks like a close match. It’s a highly detailed process that’s part art, part science. A skilled paramedical artist doesn't just apply ink; they're custom-blending a unique formula just for you, aiming for a final result that’s completely seamless.
This all comes down to the fundamentals of colour theory. Your skin isn't a single, flat shade—it’s a complex landscape of different tones and subtle undertones. An expert artist starts by carefully analysing these nuances to build the perfect pigment blend from the ground up.
Decoding Your Skin’s Undertones
The very first step is figuring out your skin's undertone. This is the subtle, underlying colour beneath the surface that dictates how pigments will look once they're healed. Nail this, and you’re on the way to a great result.
Generally, undertones fall into three main camps:
- Cool: You’ll see hints of pink, red, or blue in the skin.
- Warm: The skin has a more golden, peachy, or yellow hue.
- Neutral: There’s a fairly even mix of both warm and cool tones.
An artist will assess the skin around the scar, looking at things like how you tan and even the colour of your veins, to pinpoint your undertone. This crucial analysis ensures the final pigment heals true to your natural skin colour, rather than looking greyish or unnatural down the track.
The Crucial Step of Colour Correction
You can’t just tattoo a skin-toned pigment over a discoloured scar and expect it to work. Scars often have their own colour—pink, purple, bright red, or stark white—and that colour will show through if it isn't dealt with first. This is where colour correction comes in.
It’s a bit like using a primer before you paint a wall. If a scar is reddish, it needs to be neutralised with a pigment that has a green base. For purplish scars, a yellow-based corrector is used to cancel out the blue tones.
A skilled paramedical artist essentially "erases" the scar’s distracting colour first. By applying a corrective shade, they create a neutral canvas, which then allows the final, skin-toned pigment to heal true and blend flawlessly.
The same principles are used in cosmetics, as you can see in any good color correcting makeup guide. The difference here, of course, is that the results are permanent.
Choosing and Blending the Perfect Pigments
With the undertone identified and any discolouration neutralised, the artist can start the intricate work of mixing your final skin tone. This is never done with just one bottle of ink. It involves carefully blending several pigments to capture all the subtle variations in your skin.
For this process, high-quality, stable pigments are non-negotiable. Experienced artists only use medical-grade inks known for their stability and for healing predictably. These pigments are specifically designed to resist fading into unwanted colours over the years—a key factor for a natural look that lasts. This idea of pigment stability is just as important in other cosmetic tattoos; you can read more about how a hair tattoo looks as it ages on our blog.
The blending itself is a true art form. The artist will mix and test small dabs of the custom pigment on your skin near the scar to see how it looks. This allows for tiny, precise adjustments before the main work begins, guaranteeing the most accurate match possible. It's this painstaking attention to detail that makes all the difference.
Your Scar Camouflage Journey Step by Step
Knowing what to expect can make all the difference, turning any pre-procedure nerves into genuine excitement. The process for camouflage tattooing for scars is a far cry from what you'd find in a standard tattoo parlour. This is a clinical, carefully planned journey, with every step designed for precision, safety, and a natural-looking result.
Let’s walk through exactly what happens, from your first chat with an artist to seeing your scar beautifully blended. Understanding the process not only demystifies it but also highlights the level of care and professionalism involved.
Step 1 The Initial Consultation and Patch Test
Everything starts with a detailed consultation. This is your time to talk about what you're hoping to achieve, share the history of your scar, and ask absolutely anything that’s on your mind. A skilled paramedical artist will take a close look at your scar—its age, texture, and colour—to make sure this treatment is the right fit for you.
This first meeting is easily the most important step. It’s all about building trust and setting realistic expectations together. A true professional will be upfront about what's possible and won't move forward until you feel completely comfortable and confident.
A patch test during this appointment is non-negotiable. Your artist will mix up a tiny sample of the proposed pigment and apply it to a discreet patch of skin. This does two critical things: it rules out any rare allergic reactions and, just as importantly, it shows how the colour will heal and settle with your unique skin chemistry.
Step 2 Preparing the Scar Tissue
Once you're cleared to go ahead, the next step is getting the scar tissue ready. Scar tissue isn't the same as healthy skin; it's often tighter, less flexible, and doesn't have the best blood flow. To get the pigment to take beautifully and evenly, we first need to get the tissue in the best possible condition.
Often, this means starting with a treatment like microneedling. Using very fine needles, we create tiny micro-channels in the scar, which helps to:
- Relax and soften the dense, fibrous tissue.
- Kick-start collagen production, which improves the scar's texture from the inside out.
- Boost blood flow to the area, giving it the nutrients it needs to heal well.
Here in Australia, this prep work has proven particularly effective for post-surgical marks. Clinics specialising in scar camouflage have found that preparing the area first can improve pigment retention by up to 40%. This has led to much happier clients with C-section and skin cancer removal scars.
Step 3 Custom Pigment Blending
With the scar prepped and ready, the real artistry begins: custom colour mixing. As we’ve talked about, this isn't about just picking a colour off a shelf. It’s a meticulous process of blending multiple shades to create a formula that perfectly matches your skin's unique undertones and overtones.
Your artist will mix and test tiny dabs of the pigment right there on your skin, near the scar, tweaking it until the match is seamless. This painstaking work ensures that once everything is healed, the tattooed area will blend in naturally with the surrounding skin.
Step 4 The Tattooing Procedure
Applying the pigment is a very delicate and precise task. Using a specialised cosmetic tattoo machine with fine, sterile needles, the artist gently deposits the custom-mixed ink into the upper layers of the scar. The technique itself is completely different from traditional tattooing—it's much more superficial and gentle, designed to avoid causing any new trauma to the skin.
The artist works methodically, building up the colour in light layers. This layering approach is what creates a realistic, multi-dimensional look that mimics the subtle variations of natural skin. The skills are quite similar to other cosmetic procedures; if you're curious, you can learn about the process of getting a hair tattoo to see how these techniques are adapted for different areas.
Step 5 Healing Aftercare and Final Results
Once your session is done, the work isn't over—how you care for the area is critical for a great result. Right after the treatment, the area will look a bit darker and slightly red. Don't worry, this is a completely normal part of the healing process.
Your artist will give you detailed aftercare instructions to follow to the letter. These usually include:
- Keeping the area clean and dry for the first few days.
- Applying a specialised healing ointment to help with recovery.
- Avoiding direct sun, swimming, and heavy sweating for several weeks.
Over the next 4-8 weeks, you'll see the pigment settle and the colour soften into its final, intended shade. It’s important to know that most people need two to three sessions to get the perfect result. Each session builds on the last, allowing the artist to fine-tune the colour and coverage until the camouflage is just right.
Comparing Scar Camouflage With Other Treatments
When you're looking for a way to make a scar less noticeable, the sheer number of options can be overwhelming. From daily cover-ups to surgical procedures, it’s tough to know where to start. The key isn't finding the single "best" treatment, but discovering the best one for your specific scar, your skin, and your lifestyle goals.
Let's walk through how camouflage tattooing for scars really stacks up against the more common methods out there. By comparing everything from cost and permanence to what each treatment actually does, you can get a much clearer picture of the right path for you.
Tattooing Versus Topical and Daily Solutions
The first things we often reach for are the simple, non-invasive solutions. They're accessible and easy to try, but they have some pretty clear limitations, especially when you’re after a long-term fix.
-
Makeup and Concealers: This is your classic temporary cover-up. It can work wonders for a day out, but it takes time and skill to apply and blend well every single morning. Plus, it can rub off on your clothes, and it's hardly practical for larger scars or if you have an active, sporty lifestyle.
-
Silicone Sheets and Gels: These are fantastic tools for scar healing, particularly for new or raised scars. They do an excellent job of flattening hypertrophic scars over several months, but they don't do much for the colour of older, faded scars.
In contrast, camouflage tattooing is a "set it and forget it" solution. Once the sessions are complete and the area has healed, you're done. No daily upkeep, no smudging—just permanent colour correction that lets you get on with your life.
This image lays out the typical client journey, showing that this is a careful, multi-stage clinical process.
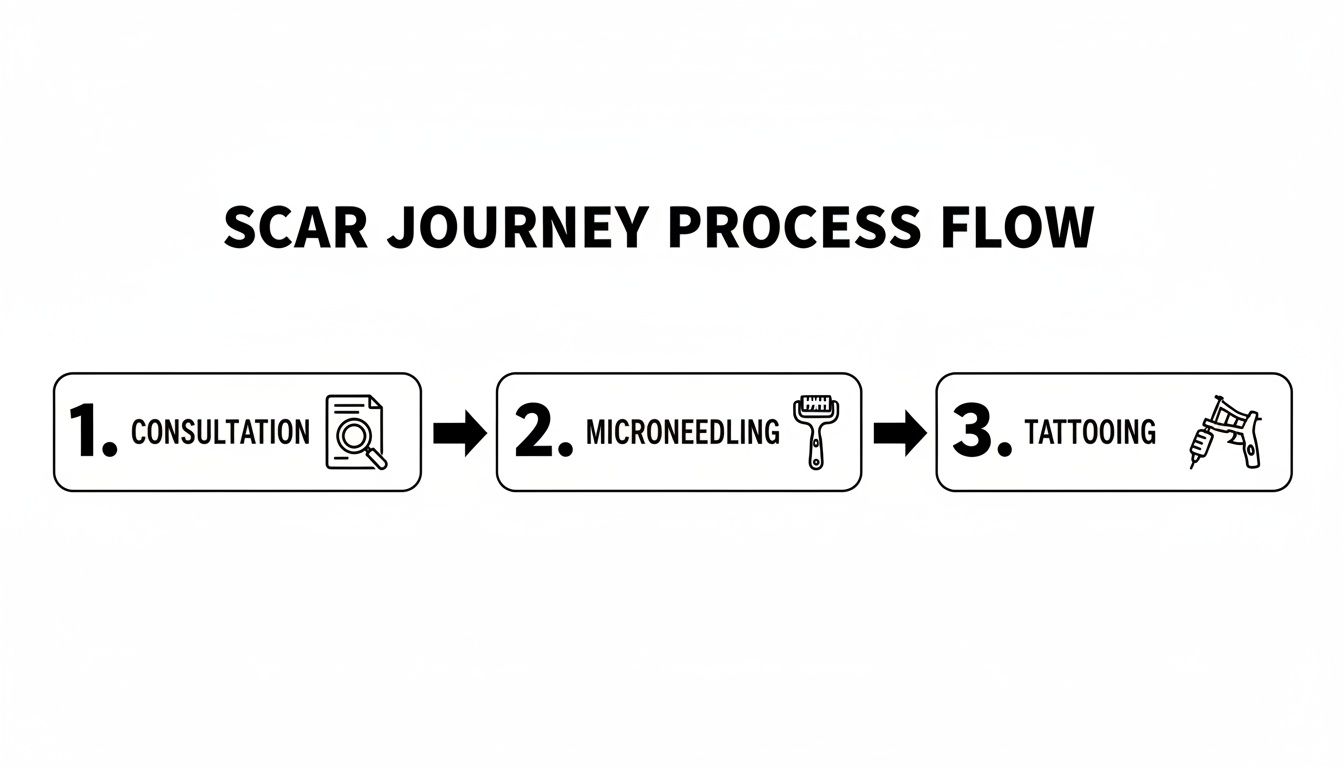
As you can see, it’s a journey that prioritises preparation and precision, not just a quick fix.
Tattooing Versus Clinical and Surgical Options
For those looking for something more permanent than makeup, clinical treatments are the logical next step. These procedures are designed to change the scar's actual structure or colour, but their approach is very different from camouflage tattooing.
Laser Therapy is a powerful option. It uses targeted light to either break down discolouration or kick-start collagen production to improve texture. It's often brilliant for reducing redness in newer scars or smoothing out uneven skin. Where it sometimes falls short is with old, white (hypopigmented) scars—and that's precisely where camouflage tattooing shines. Think of it this way: lasers work to repair the tissue, while tattooing works to conceal it by carefully adding colour back in.
Surgical Scar Revision is the most invasive route. A surgeon physically removes the old scar and re-stitches the wound, aiming to create a much finer, less obvious line. This is typically reserved for very wide, indented, or prominent scars. The catch? It involves significant downtime, cost, and the risk of creating a new scar. It changes the physical shape of the scar, but often still leaves a pale line that could need camouflaging later on.
Camouflage tattooing sits in a unique sweet spot. It's far less invasive than surgery but more permanent than daily makeup. Its entire focus is on colour correction to create the illusion of smooth, even-toned skin where the scar once stood out.
Sometimes, other skin treatments can be a great first step before considering camouflage. For example, learning how to fade acne scars can improve the overall canvas, making the final tattooing work even more effective.
Scar Treatment Options: A Head-to-Head Comparison
To make the decision a little easier, it helps to see all the options laid out side-by-side. This table breaks down the key differences to help you weigh what matters most to you.
| Treatment Method | Best For | Average Cost (AUD) | Time to Results | Permanence |
|---|---|---|---|---|
| Camouflage Tattooing | Flat, faded (hypopigmented) scars that are fully healed | $400 – $2,000+ | 4–8 weeks after final session | Semi-permanent (fades over years) |
| Makeup/Concealer | Daily, temporary coverage for any scar type | $20 – $100 | Immediate | Temporary (washes off) |
| Silicone Sheets/Gels | New, raised, or red scars (hypertrophic/keloid) | $30 – $150 | Months | Temporary effect |
| Laser Therapy | Red, dark, or textured scars; stimulating collagen | $300 – $1,500 per session | Weeks to months | Long-lasting |
| Surgical Scar Revision | Wide, deep, or severely contracted scars | $1,500 – $5,000+ | 6–12 months for new scar to mature | Permanent (creates a new, finer scar) |
Ultimately, choosing the right treatment comes down to a very personal decision. Camouflage tattooing truly excels where other treatments can't, offering a way to restore colour and visual uniformity to healed, pale scars without resorting to surgery. The absolute best way forward is to have a chat with a qualified specialist who can assess your scar and help you figure out the perfect approach for your unique situation.
Healing, Aftercare, and Keeping Your Results Looking Great
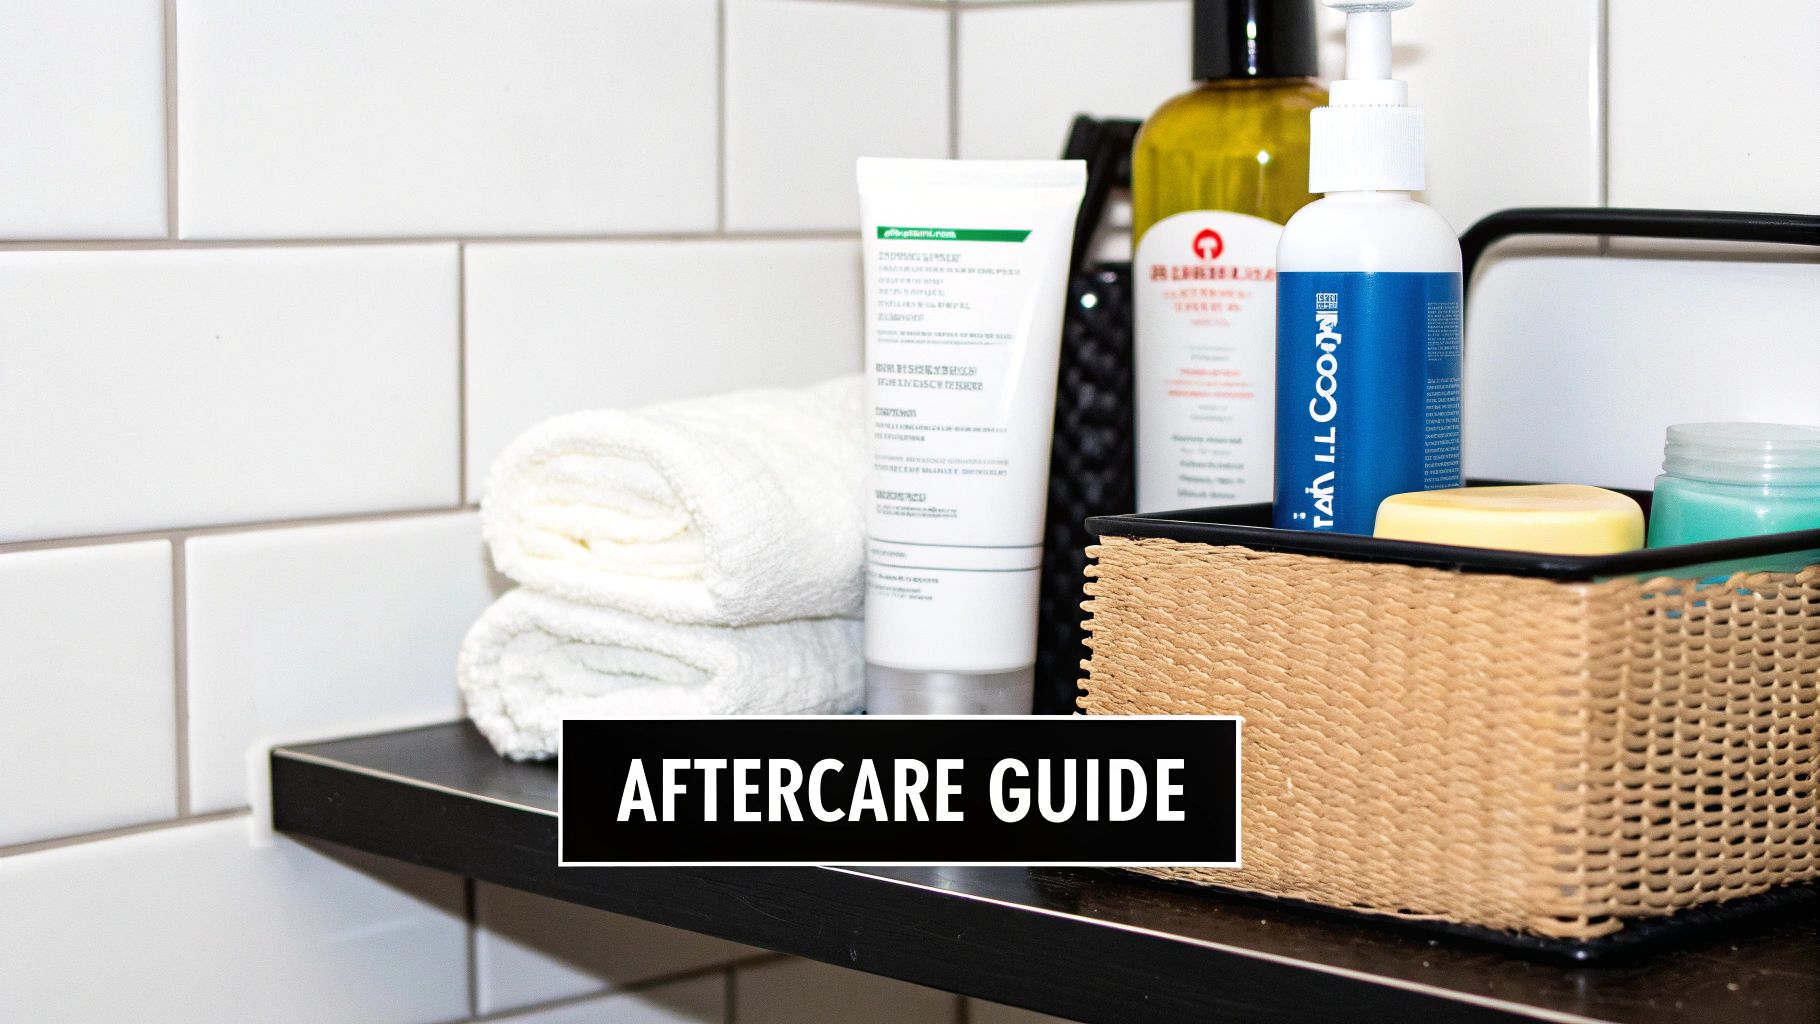
The work I do in the clinic is really only half the story when it comes to camouflage tattooing for scars. The other half? That’s all you. Your commitment to aftercare is what locks in those fantastic results, making sure the pigment heals perfectly and lasts for years.
Right after your session, you'll likely notice a bit of redness and maybe some slight swelling. The colour will also look much darker and more intense than the final result—this is completely normal and just part of the initial healing process. Don't panic! It will soften beautifully over the next few days.
Those First Crucial Weeks
The initial healing period is absolutely the most important time. I’ll send you home with a very specific set of instructions, and sticking to them to the letter is the key to getting the outcome we’re both hoping for.
The main goals are simple: keep the area clean, keep it protected, and keep it lightly moisturised. This approach helps prevent heavy scabs from forming, which can pull the pigment right out of the skin.
Think of it this way: proper aftercare is the bridge between a great procedure and a stunning long-term result. It’s where my work and your body’s natural healing process meet, and you need to listen to both.
What to Expect Day-by-Day
While I’ll tailor your aftercare to your specific needs, the healing process tends to follow a fairly predictable path. Knowing what's coming can make the whole experience much less stressful.
- Days 1-3: Keep it Clean and Dry. For the first few days, your job is to shield the area from bacteria and excess moisture. That means no direct water pressure from the shower and only cleansing the area very gently as instructed.
- Days 4-10: Moisturise and Protect. Once the skin starts feeling a bit tight or dry, you’ll begin applying a very thin layer of the aftercare balm I recommend. This keeps the healing skin supple and stops it from cracking or forming thick scabs.
- Weeks 2-6: The Settling Phase. During this time, the pigment really settles into its final look. It’s common for the colour to look like it’s fading away before it "blooms" back to life as the skin fully heals over the top.
This healing journey is quite similar to other cosmetic tattooing procedures. For a more detailed look, you can check out our guide on the day-by-day scalp micropigmentation healing timeline, as many of the principles are the same.
Long-Term Care for Lasting Results
Once your skin is fully healed (usually around the 6-8 week mark), your focus will shift from immediate aftercare to long-term maintenance. With a little bit of care, your camouflage can look amazing for a very long time.
If there’s one thing that will ruin your results, it’s the sun. UV radiation is the number one enemy of cosmetic pigment.
My Top Tips for Long-Term Care:
- Become Best Friends with SPF: Get into the daily habit of applying a high-SPF, broad-spectrum sunscreen over the treated area. This isn't just for sunny days at the beach; UV rays break down pigment even when it's cloudy.
- Go Easy on Exfoliants: Be careful with harsh chemical peels (like strong AHAs) or gritty physical scrubs directly on your camouflage. They can speed up the fading process.
- Plan for Touch-Ups: Scar camouflage is considered semi-permanent because the pigment will naturally fade over time. Most of my clients come back for a colour refresh every 3-5 years to keep the area looking seamless and vibrant.
By following these simple steps, you're not just protecting an investment—you're ensuring that you can enjoy the confidence that comes with your results for years to come.
How to Find a Qualified Artist in Australia
Choosing who to trust with your camouflage tattooing for scars is, without a doubt, the most critical decision you'll make. Your final result hinges entirely on their skill, their experience, and their artistic eye. While this field is growing in Australia, the talent isn't spread evenly. Finding a true professional takes a little bit of homework.
What you're looking for is a paramedical tattooist, not just a cosmetic or traditional tattoo artist. This is a highly specialised field that requires a deep understanding of skin trauma, how scar tissue behaves differently, and some seriously advanced colour theory. The right person will always put your safety and a realistic outcome first.
The Non-Negotiable Checklist
When you're vetting potential artists, think of it as an interview—because it is. A real pro will be transparent and happy to show you proof of their expertise. Here’s what you need to look for.
- Specialised Certifications: Ask to see their qualifications in paramedical tattooing or scar camouflage specifically. A general cosmetic tattooing certificate just doesn’t cut it.
- A Strong Portfolio of Healed Work: Fresh before-and-after photos look impressive, but the real test is how the pigment looks once it has healed and settled into the skin. Healed results showcase the artist’s true ability.
- Infection Control Certification: Make sure they hold a current certificate like HLTINF005 for maintaining hygiene standards. This is non-negotiable for ensuring a safe, sterile environment.
Don't ever feel awkward about asking to see these documents. A reputable artist will be proud to show you.
Key Questions for Your Consultation
The consultation is your chance to get a feel for the artist's knowledge and professionalism. A great artist will make you feel at ease and informed, never pressured or rushed.
A consultation should feel like a collaborative strategy session, not a sales pitch. The right artist will be honest about limitations and focus on what’s best for your scar, even if it means telling you the procedure isn't suitable.
Go in with a list of questions so you don't forget anything important.
- "Can you explain your pigment selection process?" They should be able to talk you through how they custom-blend high-quality, stable pigments to perfectly match your unique skin undertones.
- "What's your experience with my type of scar?" An artist who mainly works on C-section scars might use a completely different approach than one who specialises in facial injury scars. Experience matters.
- "What can I realistically expect from this?" A true professional will set clear, honest expectations. The goal is significant improvement, not making the scar completely invisible.
- "How many sessions do you think I’ll need?" They should be able to give you a transparent treatment plan, explaining why multiple sessions are almost always needed to build up the colour and achieve the best result.
Finding a specialist can feel a bit daunting, but many skills in the cosmetic tattooing world are transferable. For instance, you might find that searching for a local expert in one area can lead you to a clinic with a wide range of paramedical services. Exploring options for scalp micropigmentation near you is a great way to find local clinics that might also house the scar camouflage expert you're looking for. Putting in the time now is a direct investment in your safety and the final outcome.
Got Questions About Scar Camouflage? We Have Answers
It’s completely normal to have a lot of questions before diving into any cosmetic procedure. When it comes to something as personal as your scars, feeling confident starts with getting clear, honest answers. Let's walk through some of the most common things people ask us about camouflage tattooing.
Is Scar Camouflage Tattooing Painful?
This is usually the first question on everyone's mind! The good news is that most people find the process much more comfortable than they expect. Before we even start, a powerful topical anaesthetic is applied to the area, which does a great job of numbing the skin and taking the edge off.
Many clients describe the feeling as a slight scratching or a gentle vibration. We’re working on the very top layers of your skin, which is quite different from a traditional, deeper tattoo. Your comfort is our top priority, and we'll check in with you every step of the way.
How Many Sessions Does It Take?
Creating a seamless, natural-looking camouflage is an art that requires patience and precision. It’s a process, not a one-shot deal. Most clients need between one and three sessions to achieve the best possible result. Each appointment builds on the last, letting us layer the colour and fine-tune the blend.
We schedule these sessions about 4-8 weeks apart. This isn't just a random number; it's a crucial window that allows your skin to heal properly and the pigment to settle. Once the colour has fully developed, we can see exactly what's needed for the next layer to get the match just right.
Think of it like a master painter creating a realistic portrait. They don't just slap on one coat of paint. The magic happens by gradually building up tones and shades, layer by layer, to create something that looks truly real.
Can All Scars Be Treated?
This is a really important one. Unfortunately, not every scar is a good candidate for camouflage. The success of this technique really hinges on the type and condition of your scar.
For the best results, a scar should be:
- Fully healed and at least a year old.
- Lighter than your natural skin tone (what we call hypopigmented).
- Flat and relatively smooth to the touch.
We can't use this technique to lighten scars that are already darker than the surrounding skin (hyperpigmented). Additionally, raised scars like keloids are off-limits, as the tattooing process could actually trigger more scar tissue to form. This is why a thorough, professional consultation is non-negotiable—it's the only way to know for sure if your scar is suitable.
What Happens if My Skin Tans?
This is a critical point to consider for the long term. The pigment we tattoo into your skin is a fixed colour; it won’t darken when you tan like your surrounding skin does. This means that if you get a tan, the treated area can suddenly look lighter and more obvious again.
To keep your results looking seamless, sun protection is your best friend. The pigment is meticulously matched to your natural, non-tanned skin colour. By diligently applying a high-SPF sunscreen over the area, you can maintain that perfect blend for years to come.
Ready to see if scar camouflage could be the answer for you? The team at My Transformation combines expert care with true artistry to help you feel confident in your skin again. Book your consultation with us today and let's start the conversation.